When I was building new features for PlantPal, I wanted an “info card” that displays information at a glance, including plant type, watering and light needs, etc. Part of the info card is a “tag list” that contains multiple colourful tags that span multiple lines, much like inline blocks in HTML and CSS.
It took me some trial-and-error to get there, especially because this is very different from Auto Layout that we are used to with UIKit. I hope that by sharing how I built this piece of UI, I can be of help to your work, and inspire you to understand more on what you can achieve with UIKit.
To give you an overview, we are building something like this:
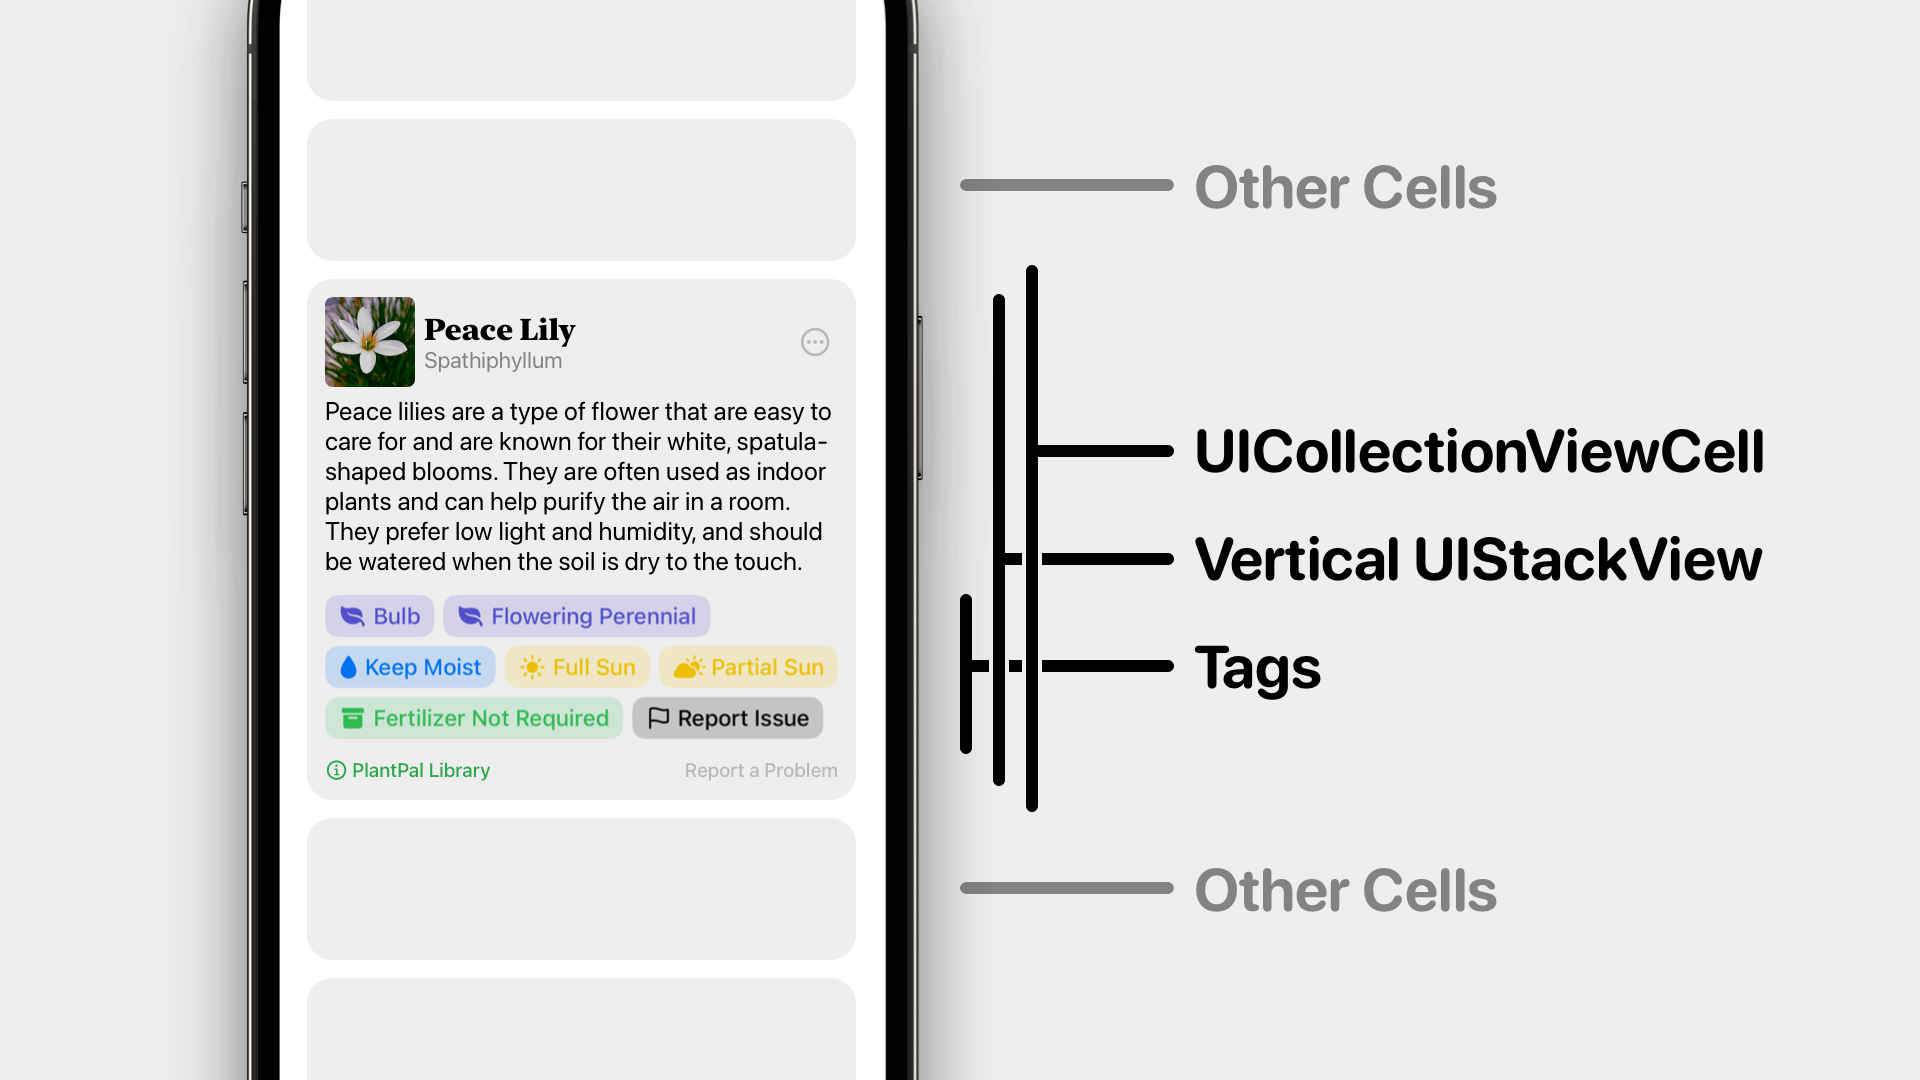
View anatomy (and yes, I know it’s not a picture of Peace Lily… It’s just some random photo I grabbed from Unsplash)
The view hierarchy is as such:
UICollectionViewCell
+-- UIStackView
	+-- (Other Views)
	+-- TagListView
	|	+-- TagView
	|	|	+-- UIStackView
	|	|		+-- UIImageView
	|	|		+-- UILabel
	|	+-- TagView
	|	+-- TagView
	|	+-- ...
	+-- (Other Views)
The view is rather straightforward to describe: each tag occupies a certain width, going from leading to trailing edge. When the tag is too wide for the remaining space in the row, it spans to the next row, aligning with the leading edge.
Auto Layout doesn’t seem to have a good built-in way to do this: UIStackView can only handle layout in one row or one column. Fortunately, I had a pretty good start when I came across this article1.
Some disclaimer:
- Yes, there are frameworks out there that you can use. But two things: 1) you still want to understand how they achieved the tag layout, and 2) you want to avoid having something in your code that you can’t fathom.
- This is very different from UICollectionView layout, where each tag would be a UICollectionViewCell.
Building TagView
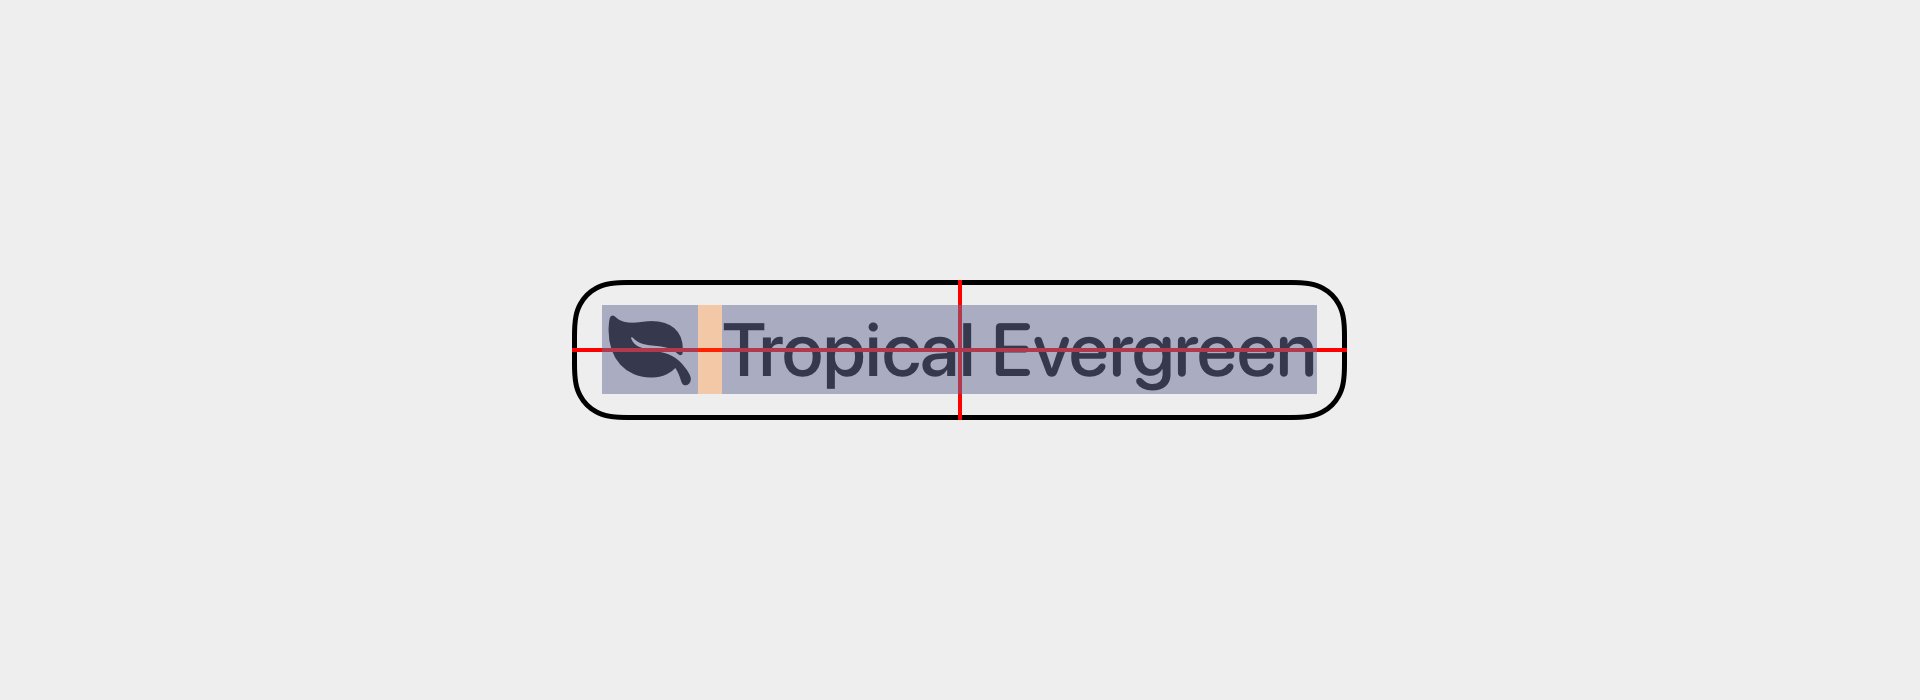
Anatomy of a TagView.
TagView is rather straightforward:
- A UIStackView contains a UIImageView (of a SFSymbol UIImage) and a UILabel
- Both UIImage and UILabel are configured with 15 point size font
- The UIStackView centrally aligns both vertically and horizontally
- The UIStackView has a 4 pt spacing
- The UIStackView has 5 pt leading and trailing margins
- The outermost rounded rectangle has a fixed height of 28 pt (we set aside accessibility and dynamic font size for now)
Building TagListView
With TagView built as the element, we now construct the TagListView that contains an array of TagView instances. This TagView—
- Receives width from its super view
- Puts the TagView instances in their correct positions, spanning onto the next line if the remaining space isn’t enough for the next tag
- Ultimately, resizes its own height so that the bottom edge “hugs” the last TagView’s bottom edge.
To achieve this—
- Create a private method named
layoutTags()that handles the calculation of each tag’s frame. This method is private because other objects should not be concerned of its implementation, and they shouldn’t be allowed to lay out TagListView’s subviews directly, anyway. - Create a
configure(for:)for configuration and initial layout. Assign the TagView instances to a private property, and add a height constraint that automatically hugs the bottom edges. - Within
configure(for:)we calllayoutTags()for the first time. Then we calllayoutIfNeeded()to commit subview frame updates in the current UI update loop. - Finally, we override
layoutSubviews()method from UIView. This method is called when TagListView receives a new width from its super view. Whenever this happens, we lay out the tags again, but don’t have to calllayoutIfNeeded(). This is because layout happens in the samelayoutSubview()loop.
To put the above in code—
class TagListView: UIView {
	// ...

	private var tagViews: [TagView] = []
	private let tagHeight: CGFloat = 28
	private let tagSpacingX: CGFloat = 8
	private let tagSpacingY: CGFloat = 8

	// ...

	func configure(for tags: [Tag]) {
		// implement your own logic to create and config each TagView
		self.tagViews = tags.map({TagView(for: $0)})
		if let lastTag = self.tagViews.last {
			NSLayoutConstraint.activate([
				lastTag.bottomAnchor.constraint(equalTo: self.bottomAnchor),
			])
		}
		self.layoutTags()
		self.layoutIfNeeded()
	}

	override func layoutSubviews() {
		super.layoutSubviews()
		self.layoutTags()
	}

	private func layoutTags() {
		let containerWidth = self.bounds.width
		var currentOriginX: CGFloat = 0
		var currentOriginY: CGFloat = 0

		// Loop through and layout each tag view
		tagViews.forEach { label in
			// if current X + label width will be greater than container view width
			//  "move to next row"
			if currentOriginX + label.frame.width > containerWidth {
				currentOriginX = 0
				currentOriginY += tagHeight + tagSpacingY
			}

			// set the btn frame origin
			label.frame.origin.x = currentOriginX
			label.frame.origin.y = currentOriginY

			// increment current X by btn width + spacing
			currentOriginX += label.frame.width + tagSpacingX
		}
	}

	// ...
}
Build and run it, and… You may find that the views don’t really lay out well… What’s wrong?
It turns out that we have one step missing for TagView: when we’re still in the process of laying out the subviews, how would UIKit know about the width of each tag?
Enter intrinsic content size.
Specifying Intrinsic Content Size
Intrinsic content size is the default way to tell UIKit how much space the content wants to take, without knowing its super view and Auto Layout constraints.
For UILabel and UIImageView, intrinsic content size are automatically specified, so you don’t need to do a thing — a label that contains longer text will have greater intrinsic content size width; an image view that contains a “fat” SFSymbol image has greater intrinsic width than one with a “tall” image.
You need 4 constraints to lay out a view. But remember when you lay out a button or a label, you can simply just specify one Center X constraint + one Center Y constraint? That’s because the button (or label) has intrinsic content size constraints that kick in. The UILabel instance, for example, calculates its intrinsic size based on the font and text content. They know their intrinsic size before any UIKit layout happens.
How do we apply intrinsic content size to our custom TagView? It turns out to be just math. Our tag view has a simple setup: a horizontal UIStackView that has a UIImageView and a UILabel as its subviews, like this—
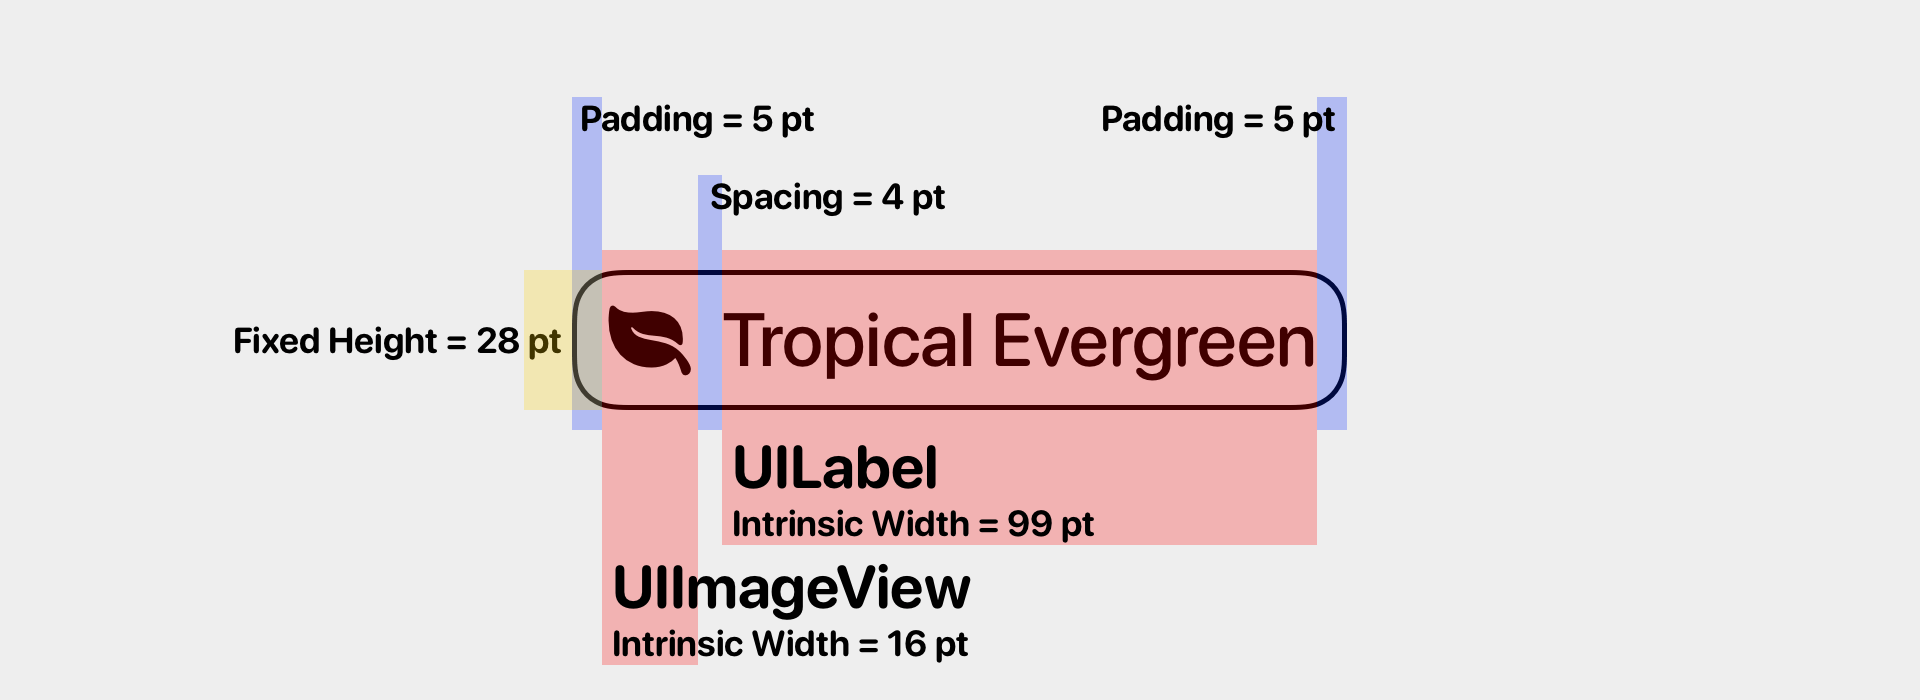
Tag view anatomy, and how intrinsic content size is decided.
To construct the tag view, we use Auto Layout to centre-align the UIStackView both vertically and horizontally. Then we specify that the tag view’s width is the width of the UIStackView + 10, to leave some paddings on both sides.
With this setup, our tag view’s intrinsic size is easy to calculate:
class TagView: UIView {
	// ...

	override var intrinsicContentSize: CGSize {
		let width = imageView.intrinsicContentSize.width + label.intrinsicContentSize.width + 4 + 5 + 5
		let height = CGFloat(28)
		return .init(width: width, height: height)
	}

	// ...
}
Now that we configured the intrinsic content size, our TagListView can start laying them out!
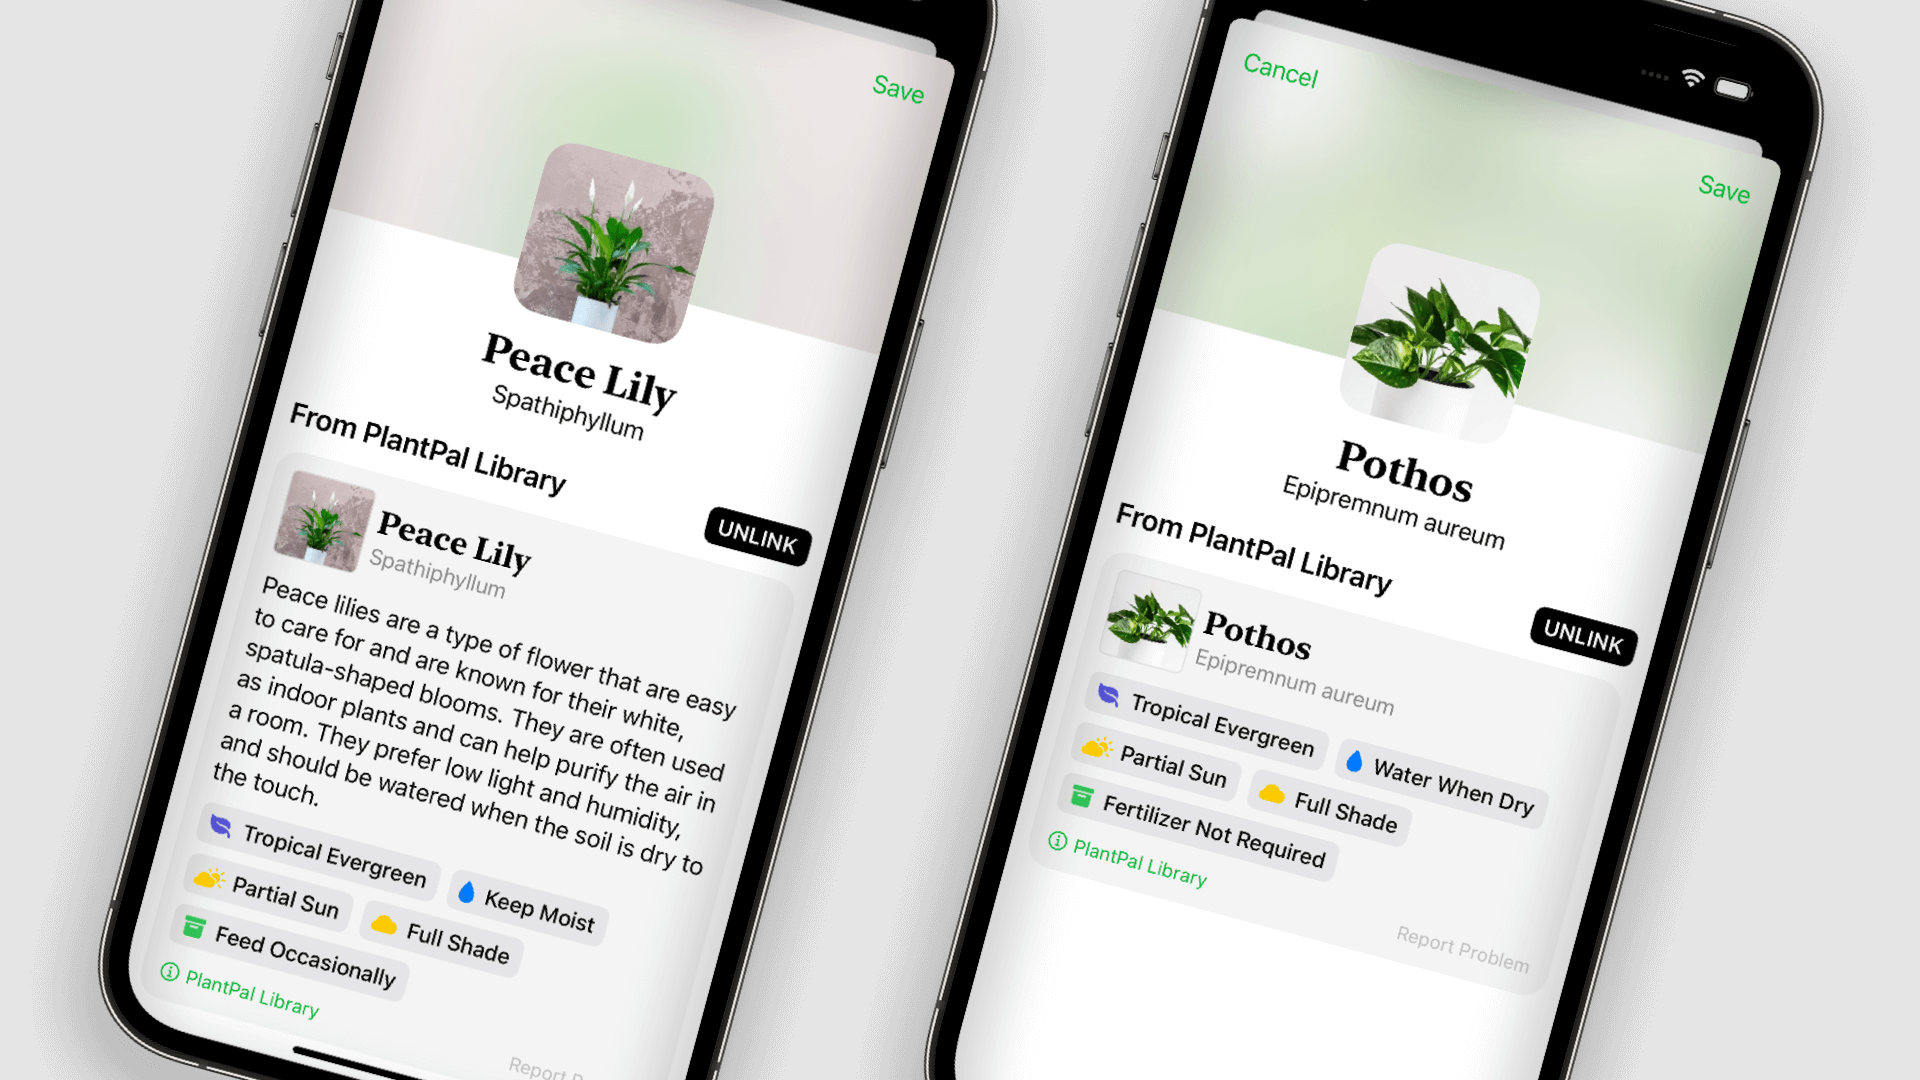
Putting It All Together
The final step is to assemble our TagListView in a custom UICollectionViewCell.
To achieve that, we can just use Auto Layout the way we usually do, with four constraints: top, bottom, leading and trailing.
And voilà! Our custom tag layout is ready for the world.
Further Considerations
Frame-based layout vs. Auto Layout
By using frame-based layout, we have more flexibility of iterating through each tag view, and can decide when a new tag should go to the next row.
To be clear, when we specify a view’s frame we are still leveraging Auto Layout. It’s just that with translatesAutoresizingMaskIntoConstraints set to true, the frame of the view is translated into a set of four constraints in the layout system.
That’s to say, we are technically still leveraging UIKit Auto Layout; it’s just we are creating constraints in a very different way.
Adapting tags for accessibility
Tags will be too small to read for people who enable dynamic font size. Consider being more flexible on how you calculate intrinsic content size height.
Hint: use the greater heights for UIImageView and for UILabel.
Localization for right-to-left text
Some language scripts read right-to-left, and so should the tag layout developed to work in those localizations.
By using UIStackView in our TagView, layout direction is handled automatically, but when we programatically computes layout for TagListView, we should check if the trait collection indicates the view is reading right-to-left.
-
I am having a hard time finding the original Stackoverflow post that helped me… I’ll keep looking but please get in touch if it’s your work, or if you came across the post. ↩